Monday, October 4, 2010
A Quick Postscript re., "Oopsey!"
Ugh. Our customer wasn't 100% on this one. There was question about the color match and the "smoothness" of the drawer front's finish. It happens. When customer satisfaction is in question our goal is to make it right...consistent with industry standards. In this case the choice of another finish material and an adjustment to the color are appropriate responses. As a general rule maintaining a collaborative relationship is the key to mutual satisfaction.
Thursday, September 23, 2010
"Oopsey!"... It's one of the reasons I can serve you.
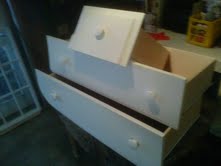 Here are three drawers, all part of a matched set complimenting a baby's attractive changing table. I suggest they are all white, but alas, we all know white is rarely just "white." It's a secret blend of reds, or blues, or yellows.
As a Re-finisher I have not so secretly wondered if the formula for "White" has been (but other colors often suffer the same manipulation) concocted to make life more fun for me and others, like me, who just want to serve customers successfully. (I've learned to place such emotionally muscular exercises in the category of character development.)
The story behind this: The changing table enclosing these drawers was newly purchased and happily on its way home when, "Oopsie daisies," they spilled out and onto the ground. The smallest one took the worst of the insult. It landed smack on its decorative corner crushing it quite severely. No it was not a pretty site. The others sustained comparatively superficial damages with scrapes and chips here and there. And that's where the issue of "white" comes into the story.
Matching colors is always something of an adventure--and it's always doable. This "white" was no exception. So wow, look at them now! (OK, the picture isn't the best and really doesn't do the situation justice.) The picture does offer the general idea. They will all soon be reunited with the dresser and everyone, including the much anticipated baby, will be beneficiaries; a little story albeit a contributing preface in an obviously longer and more novel adventure....serendipitously interrupted in the tradition of "Wood Talkin."
Thursday, August 26, 2010
Mystery In an Old German Steamer Trunk
As trunks go, this one is not pretty or handsome in traditional terms. However, what it lacks in the way it looks is more than made up in its mystery and intrigue.
It's a simple pine box. The two metal straps across the top and bottom are hand made...flattened and elongated patiently by a Black Smith's hammer strokes. The hinges are respectively distinct, non-transferable. All the nails are hand made...forged, square shanks with hammered heads. The lock mechanism (of the Skeleton Key variety), was probably originally fashioned in a lock smith's shop. My guess is that it was likely to have been purchased for this application and then placed and secured in the trunk by its creator.
The box's corners are secured with hand cut dove tail joints (see the picture!). The boards across the top and on the sides are held in place with hand made dowels. It has no internal shelves or evidence of there every being any...just a big pine box...and the
 re is nothing
  inside or on the walls of the box to suggest otherwise. However, there are words scrolled, again in cursive, across a portion of the front inside panel (near the floor) of the box--again in German.
There are three well-faded packing labels on the sides of the trunk (one shown). They are unmistakably German in origin--Hamburg was either a destination or a point of departure on at least one trip. These tell-tale hints suggest the trunk traveled in the belly of a ocean going steamship--a "Steamer Trunk"--and I'm going to guess there were some associated railway adventures. At some point in the past the entire box, including all metal pieces and the hinges, was coated with a rust (i.e., cedar) toned stain. I'm guessing it was a pigmented shellac-type sealer.

Finally, scrolled in cursive across the top of the lid, apparently also in German, you can see as it were a possible title or statement of some kind (Can you read it?). Perhaps this is a reference to the owner, or to the nature of the box and its contents.
I originally assumed this trunk was a vintage post 1900. Given all the hand work we see, I'm going to guess we're peering into the mid-to late 1800's. The challenge for me in doing this kind of work with precious pieces like this old trunk is that of not doing too much to it! "Restoration" can mean many things to different people. In this instance the goal is that of keeping it vintage--authenticity reigns the day.
Wow, these are the joys when we get to hear "Wood Talkin."
It's a simple pine box. The two metal straps across the top and bottom are hand made...flattened and elongated patiently by a Black Smith's hammer strokes. The hinges are respectively distinct, non-transferable. All the nails are hand made...forged, square shanks with hammered heads. The lock mechanism (of the Skeleton Key variety), was probably originally fashioned in a lock smith's shop. My guess is that it was likely to have been purchased for this application and then placed and secured in the trunk by its creator.
The box's corners are secured with hand cut dove tail joints (see the picture!). The boards across the top and on
 the sides are held in place with hand made dowels. It has no internal shelves or evidence of there every being any...just a big pine box...and the
 re is nothing
  inside or on the walls of the box to suggest otherwise. However, there are words scrolled, again in cursive, across a portion of the front inside panel (near the floor) of the box--again in German.
 There are three well-faded packing labels on the sides of the trunk (one shown). They are unmistakably German in origin--Hamburg was either a destination or a point of departure on at least one trip. These tell-tale hints suggest the trunk traveled in the belly of a ocean going steamship--a "Steamer Trunk"--and I'm going to guess there were some associated railway adventures. At some point in the past the entire box, including all metal pieces and the hinges, was coated with a rust (i.e., cedar) toned stain. I'm guessing it was a pigmented shellac-type sealer.

Finally, scrolled in cursive across the top of the lid, apparently also in German, you can see as it were a possible title or statement of some kind (Can you read it?). Perhaps this is a reference to the owner, or to the nature of the box and its contents.
I originally assumed this trunk was a vintage post 1900. Given all the hand work we see, I'm going to guess we're peering into the mid-to late 1800's. The challenge for me in doing this kind of work with precious pieces like this old trunk is that of not doing too much to it! "Restoration" can mean many things to different people. In this instance the goal is that of keeping it vintage--authenticity reigns the day.
Wow, these are the joys when we get to hear "Wood Talkin."
Saturday, July 3, 2010
They say they want to go home!

This furniture manufactured by Henredon in North Carolina is really attractive stuff. Much appreciation to their Customer Service people for the help they were able to offer. So, two days in the application of the finish coats (i.e., repeated spraying, curing and sanding) we're ready for the last step--buffing them out. Does anything really feel better than success?!
Wednesday, June 30, 2010
Oops. Three Steps Forward--Two Steps Back
"The refinishing process is rarely fail-safe." That's a little mantra I try to keep in mind...all the time. But it still surprises and disappoints me when what I think is a simple "sure thing" procedure or process goes amok. There are a wide variety of variables to influence the refinishing process including, for example, materials' compatibility, contaminants, and timing. Whatever the case if or when it happens it's always key to figure out what went wrong, fix it, and move forward.
Interesting developments: The initial coats of finish to the chest and the side table "blew-up. So, now we're in the midst of the "what went wrong" investigative process. Getting "Wood Talkin" can happen in surprising ways. Most of the time it's the wood itself, but other times, as in this situation, it may be information or insight born external to the the woodworking/refinishing process. In this instance an inquiry to Henredon Mfg in Morganton, NC, offered some helpful insight.
Many of the formulas and procedures used by furniture manufactures are proprietary. (Then an experimental effort to "detect" how they did it ensues.) I expected no less from the Henredon people...and I was right. The Henredon people were very nice, but sadly I learned that Henredon's finishing division was dissolved in 2007! The shop people I would have liked to discuss my situation with are no longer available. Ugh.
But this inquiry was not a lost effort, so this is only a temporary set-back. The customer service staff were able to offer me some helpful information for which I am grateful. I believe what they provided is sending me in the right direction for what we want to accomplish here. OK. Nevertheless, what they told me is certainly a sad commentary on the general state of our nation's economic situation--something we all feel in various ways.
So, "back to the drawing board" in this case means that we back-up and start the refinishing effort with these two pieces again.
Monday, June 28, 2010
A Fun Before-n-(almost) After
This wonderful Oak Side Table has the distinctive one-of-a-kind look to it. As you see it here it has been separated from a marvelous set of twisted wrought iron legs (not shown). The legs accent the table's "check me out" features. Arranged under the table, three at each front corner and with several more along the back below the frame, they are bent gracefully and twisted (axially) into the form of musical treble clefs (if I'm remembering it all correctly) . The customer requested the oak top be finished to match his Henredon Chest and other handsome Henredon pieces found in the home.

Late last week we sanded, filled, and glued down swollen grain in the top of this piece (Uh huh, some water damage...a previous owner). It cured throughout the day and was then sanded and stained to cure through the weekend. Also, the top of the Henredon Chest (also see previous blog entry) was skinned to eliminate those (aforementioned) rings. Some checks and crazing in the front, left, corner of the chest were also glued and pressed in preparation for sanding and refinishing. Then, similar to the side table, it was stained to cure.
Here's an interesting observation...
The edges of this custom irregularly shaped side table reveal more than an inch thickness of oak end grain. To the casual observer it appears the table is a substantial piece of Red Oak. A really nice touch! But upon closer inspection that handsome end grain (that graceful "curve" on each end) has only slightly more than 1/4" in thickness. Since, in general, wood tends to expand and contract more across the grain than with the grain, modest changes in humidity make this highly decorative end grain configuration both beautiful and a bit delicate. Some cracks were apparent, and were filled accordingly before the staining process. These are likely to reappear depending on the moisture the air.
Today both pieces received a glazing coat with distressing and some prep with steel. Also, they received a lot of doting attention and cured most of the afternoon. Aha, an initial late PM application of lacquer finish and they will be ready for some nib sanding and another finish coat tomorrow. It'll be followed by some hand rubbing and a lot more TLC. (See, no more rings!)

Late last week we sanded, filled, and glued down swollen grain in the top of this piece (Uh huh, some water damage...a previous owner). It cured throughout the day and was then sanded and stained to cure through the weekend. Also, the top of the Henredon Chest (also see previous blog entry) was skinned to eliminate those (aforementioned) rings. Some checks and crazing in the front, left, corner of the chest were also glued and pressed in preparation for sanding and refinishing. Then, similar to the side table, it was stained to cure.
Here's an interesting observation...
The edges of this custom irregularly shaped side table reveal more than an inch thickness of oak end grain. To the casual observer it appears the table is a substantial piece of Red Oak. A really nice touch! But upon closer inspection that handsome end grain (that graceful "curve" on each end) has only slightly more than 1/4" in thickness. Since, in general, wood tends to expand and contract more across the grain than with the grain, modest changes in humidity make this highly decorative end grain configuration both beautiful and a bit delicate. Some cracks were apparent, and were filled accordingly before the staining process. These are likely to reappear depending on the moisture the air.

Today both pieces received a glazing coat with distressing and some prep with steel. Also, they received a lot of doting attention and cured most of the afternoon. Aha, an initial late PM application of lacquer finish and they will be ready for some nib sanding and another finish coat tomorrow. It'll be followed by some hand rubbing and a lot more TLC. (See, no more rings!)
Friday, June 25, 2010
Pride of Ownership


It's a Henredon Three-Drawer Chest. This one is finished in what is traditionally characterized as a Limed Oak style. (There is quite a wide variety of shades and nuances in these "Limed Oaks.") This one had the misfortune to acquire some colored rings in its top surface (probably the base of a beverage glass), and it has a small but nasty chip in the veneer of a drawer front. Life seems to do that; everybody gets those bumps, bruises, and wrinkles sooner or later. Oh well, we can fill and match to remove the chip and resurface the top to eliminate those rings.
In a previous blog entry I explained a simple technique for removing similar rings from the top of a clear lacquer finish. It would be nice if we could employ that same technique here. If it were doable the piece could have been repaired in the home. When color is involved in the surface, as in this situation, it's generally a shop repair.
Subscribe to:
Posts (Atom)
