Here's where you come to follow the progress of your piece of furniture in the shop. No, wood doesn't talk--or does it? Sure it does! As we work on your piece we learn things about where it's been, how it's been used, maybe even who (or what) has used it, and often about where it came from originally. It's a lot of fun and typically quite interesting.

This space also gives us a chance to let you know about any special experiences or progress related challenges. We try to chronicle work completed on your furniture whenever anything significant occurs. So there may not be an entry every day, but when we document them, we hope you will find these journal entries are fun, informative, purposeful, and creative.

So, have fun "listening" to our dialogue with your piece, as it is, it's Wood Talkin.
Email: woodtalkin@gmail.com

Saturday, May 5, 2012

Check-out the progress

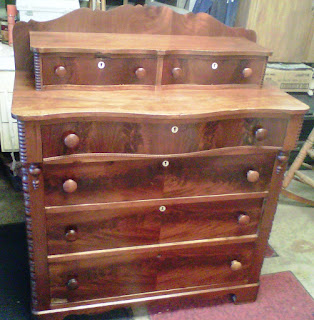
As I said ... this Empire era dresser gets my motor revving. So I've got to show you what's happened since we walked it in the door.  

It's seen a lot of elbow grease removing stains and spots and restoring its overall color integrity. That's been the main effort to date. Check it out. Cool huh.

 
So, we officially end the week. 

That's Wood Talkin.

Thursday, May 3, 2012

1810-1837 Empire Dresser

It felt as though the other pieces in the shop stopped breathing. They were poised in acknowledgement as I carried this "fine old gentleman" in the front door. This is a piece that even gets me all twitterpated!  

Consistent with the skills of the Empire era, it's all hand made--from the flat stock on the dresser's backside including the screws and nails that hold it together and in place, to it's joints, screw and dowel holes. It's unquestionably the real deal! We're going to use some "old world" refinishing skills and techniques here. It's about historical appreciation and the preservation of INTEGRITY!

When I'm in a customer's home being introduced to a piece, usually in order to offer an estimate for its repair or refinish, I generally don't get to really SEE IT. So, developing a realistic and factual relationship with the piece is the first thing I do when it comes to the shop. I get to carefully inspect it. It's an event much like going to the doctor's office for the yearly check-up. So, I start talking to it, getting to know it personally. Hopefully it marks the beginning a pleasant conversation and a lasting friendship. 


This wise old man is quick to carry his side ... of our conversation, and he's got some really fun stories to tell about the past 192 years!

Straight slots and those horizontal lines are from the artisan's plane
To start, all the drawers are signed with the craftsman's scrawled initials. Then, on the back of the dresser I found what I suspect is the location of the shop in Milwaukee where it was made (below--and yes it's hard to read).

J. Teedeman's, 15704  Reed Street, Milwaukee
 Check out the screws (above the signature pic). Yes, they are the same diameter, but you can see irregularity in the placement of their hand-made "straight slots."

The hat pin has slid back and forth...follow the ball
Finally, here's a really unexpected find! Yes, it's a black hat pin (above) lodged in the cabinet's upper left corner at the back of the top drawer's frame and slide. It's understandably rusty and you can see it has moved back and forth--see the friction marks against the outside wall of the dresser--but there it is....and my client doesn't use hat pins! So, how long do you suppose it has it been there? Fun, huh.

Ok. There are more stories to tell and pictures to see, but we'll save them for another blog. So you better keep listening....because it's Wood Talkin for today!
Wednesday, May 2, 2012

Cherry Record Cabinet Update

Do you remember seeing this little beauty? Well, here she is in all her splendor. She is really special for her quarter-sawn veneer inlay in some patterns that really catch the eye and maximize the contrast and color effects. I've pulled up the "before" picture, too, and placed it (down below) so you can compare it to the way she looks now. Um mm, she is a stunner! As you can see--although barely in these pictures (sorry)--the damage to the top repaired perfectly. 


I suspect she was probably manufactured in the mid-to-late 1940's, and my guess is that there were a limited number made of this particular veneer pattern and design. On the bottom of the cabinet is a number, probably the number of the cabinet, i.e., number 135 of an anticipated 200 to be made.

She wants to go home and in response to her wishes the delivery is scheduled this Friday. It's been fun!

That's Wood Talkin for this morning. Keep listening ... because wood talks!

Monday, April 30, 2012

Updates, updates, updates...

Here are some newly completed pieces you first saw in earlier blogs. Remember those chairs with the cane seats that had "blown-up" (April 17th's blog). Well look at the cane seats now...good as new again! These chairs have navigated the challenges through several generations already; they have the battle scars to prove it. Yes, they would definitely benefit from some cleaning-up, but it's not going to happen this time around. Nevertheless, it is unanimous--I heard it from them!--they're happy to be going home.


And...do you remember the 60's-styled solid Mahogany lamp table? As I mentioned in the previous blog, it appears to have been a high school shop project for a student (John Toohey...anybody know him?). Well, here's that project some 40 years later and it's pretty nicely weathering life's storms, wouldn't you agree? I wonder what John would think of it know? Nice job John. Memories, memories--yes, wood does talk!


In the final stages of this finishing process I stumbled into a reeeeely bad case of "fish eyes." They're never any fun. In this case I believe I know why it happened, but as a result I had to do a lot of heavy duty buffing to lessen the damage. For your information, "fish-eyes" are a circular rumpling of a still wet newly applied surface finish. It's caused when oily-type impurities have penetrated the finish surface of the wood to lurk on or just beneath it's surface and "rumple" the wet finish--it's a reaction kind of like an oil on water phenomenon. Once they appear there's little a finisher can do but start all over again...or invest a lot of time and energy through several surface applications and buffing, buffing, buffing. Even then the final surface product often remains mildly compromised. Here, below, is a close-up picture of what these "eyes" looked like staring up at me from the piece's surface. Ugh, but I did a good job softening their stare this time. I think we foiled em. Ha. They won't painfully detract from the color and depth of the Mahogany's beauty.
OK...that's WoodTalkin for this morning. Keep listening for those fun whispers.
Dick

Monday, April 23, 2012

Incoming...

Of course we've all stood in line. We started doing it in Kindergarten, but then nobody every told us we were developing a skill we'd be using for the rest of our lives. Now some of us are better at it than others. These pieces have just joined the Que-- newest additions to the shop's lineup. 

This little quarter sawn cherry record cabinet (below) displays it's wonderful veneer inlay--it's already a beauty. We're going to gently restore it to it's former magnificence.
 This little SOLID mahogany lamp table (below) appears to have been a high school shop project. As with all of us its lines clearly date it, but it will go nicely with the color and finish of the recliner it's being paired with.
That's Wood Talkin' for now. Keep listening. 

Wednesday, April 18, 2012

Red Oak Library Table

This beautiful old Mission-styled table glows again. In keeping with it's near antique status the choice was to remove the rings from the top of the table as best we could. That was done primarily with commercial grade bleach (and a lot of patient perseverance). Then the goal was to restore continuity of color and patina to the top. Sanding a jewel like this is an effort of only the very last resort, so in this case it was kept to a bare minimum--only as needed to support that color continuity effort.

So, what you see here (below) is what you get. The dark rings are 95% gone; a mere shadow remains of their haunting "before" presence. (Of course our customer will pass final judgment on this outcome.) What you see in the pictures is finished in a fine "hard" oil then waxed and buffed to a soft patina typical of the antique world. It's a finish that is easy to maintain with the quarterly application of some good quality furniture polish (Guardsman polish is recommended). It will feed the wood and keep it from drying in Colorado's semi-arid climate.

Here's a fun observation made along the way. As the table was originally being fabricated (probably @ 1940), its drawer bottom was cut just a smidgen too small. As a result the bottom didn't fit tightly into the grooves designed to hold it. The weight of the drawer's contents then tended to warp downward. (Check out the little pic, right. See the gap!?) Wow, isn't it interesting that even back then they had an occasional "bad day." Haaa, in April, 2012, we fixed it. Super.

That's Wood Talkin' for today. Keep listening!

Tuesday, April 17, 2012

At the Door...


New arrivals this past week or so include...
Four wonderful antique red oak dining chairs and a wonderful antique red oak library table. Yes, these have their own stories to tell, and yes, a great part of their stories is in the obvious scars they have to show for the tales.

So, we'll be back...and keep listening.